
Using the shortcode #
Here’s a step-by-step guide on how to use the [payhip-lists] shortcode to create a products page on your WordPress website:
- Create a new page or post on your website where you would like to display the list of products.
- In the content editor for the page or post, add the shortcode [payhip-lists].
- Publish or update the page or post.
- The list of products from your Payhip store will now be displayed on the page or post where the shortcode was added.
Customization #
In order to customize the appearance of the products page created using the [payhip-lists] shortcode, you can use the “Customize” option in the top bar of the WordPress dashboard. Here are the steps in more detail:
- Log in to the WordPress dashboard for your website.
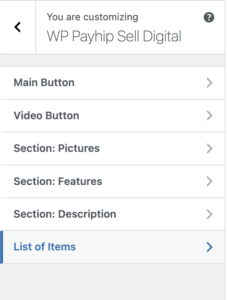
- Click on the “Customize” option in the top bar.
- In the left sidebar, navigate to the “WP Payhip Sell Digital” option and select it.
- Once the plugin’s customization options load, you should see a “List of items” option.
- Click on the “List of items” option.
- You will now have access to various customization options such as changing the color scheme, font, layout, and more.
- Make the necessary changes and click on “Save & Publish” to apply the changes to your products page.


